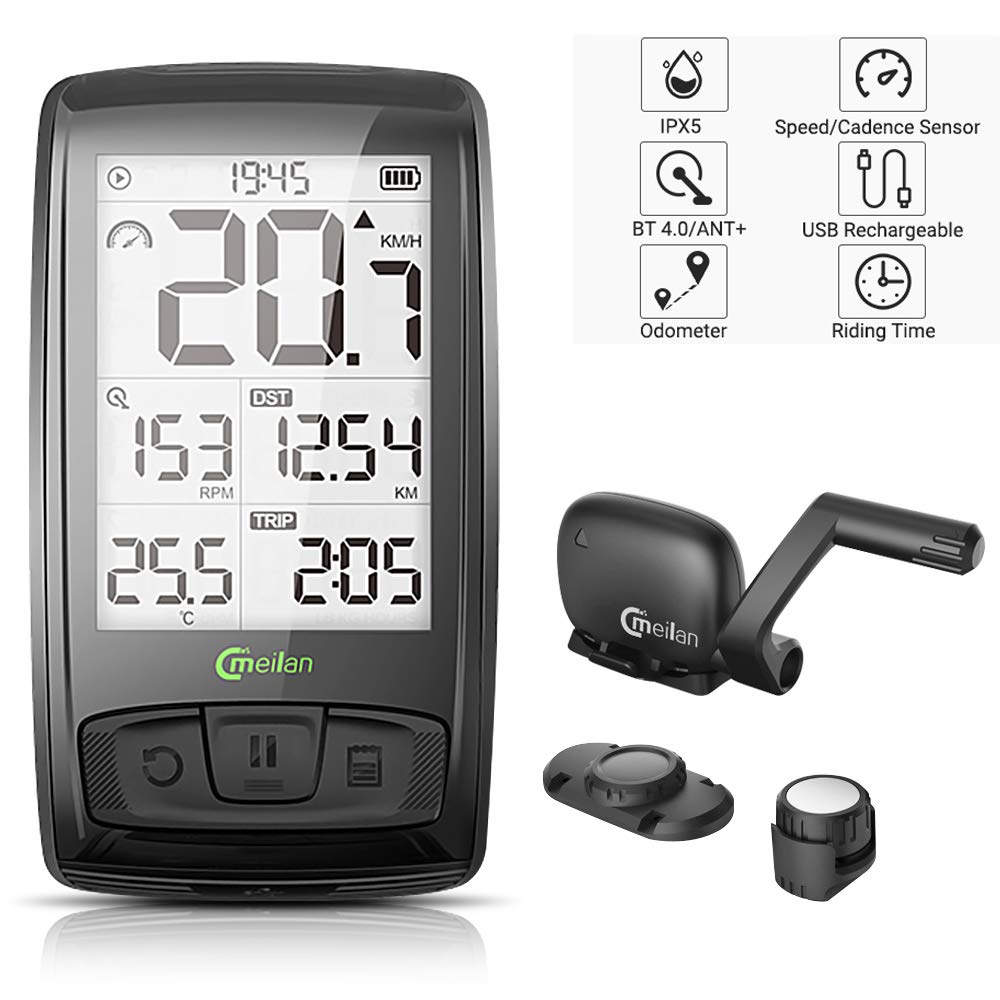


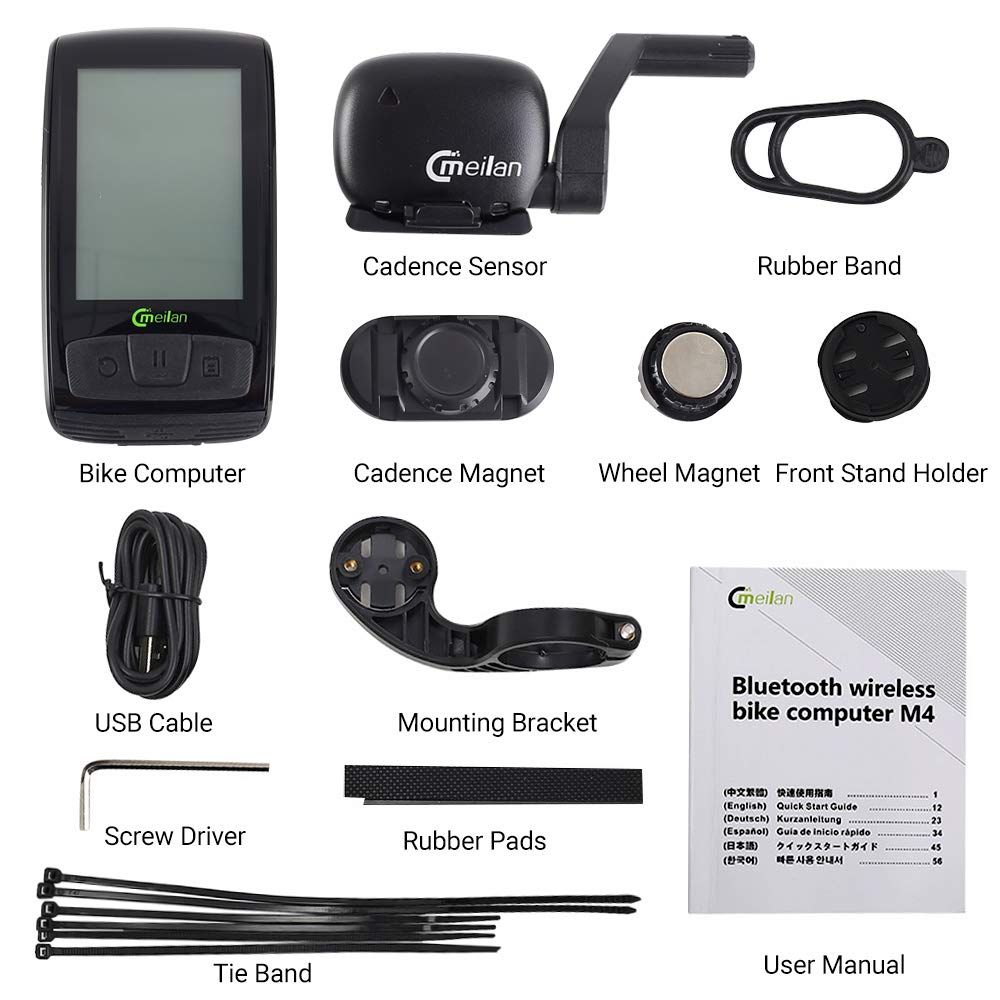
Specification: Input: DC 5V 0.5Ah Battery Capacity: 800MAH rechargeable battery, it can be used for more than 80 hours without backlight. Sensor Battery: Replaceable battery, 230Mah Wireless Frequency: 2400-2483.5Mhz Temperature: -10---40Degree Waterproof: IPX5 Package Include: M4 Bicycle computer x 1 Front knob holder x 1 User Manual x 1 Front stand holder x 1 Tie Band x 6 Wireless speed/ cadence sensor x 1 Wheel magnet x 1 Pedal magnet x 1
A**.
Well built wireless cycling computer that measures both cadence and speed. Easy install.
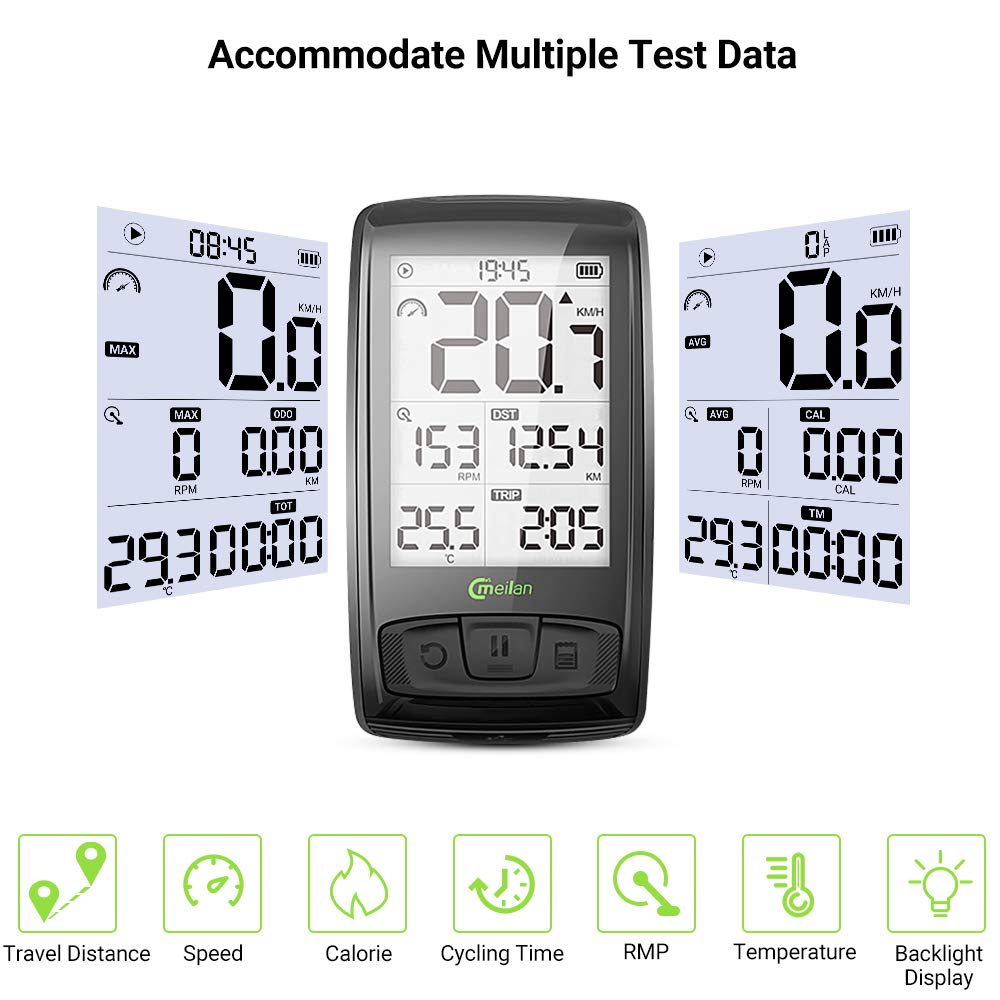
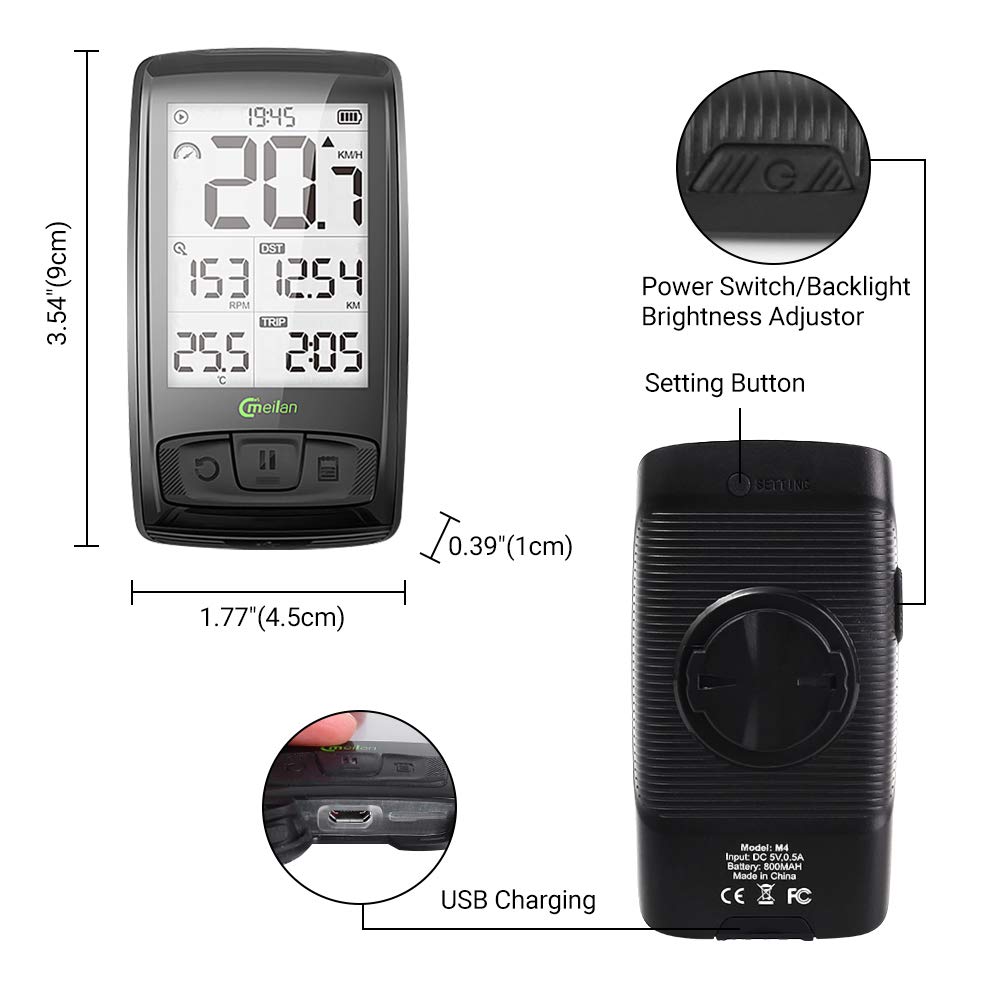
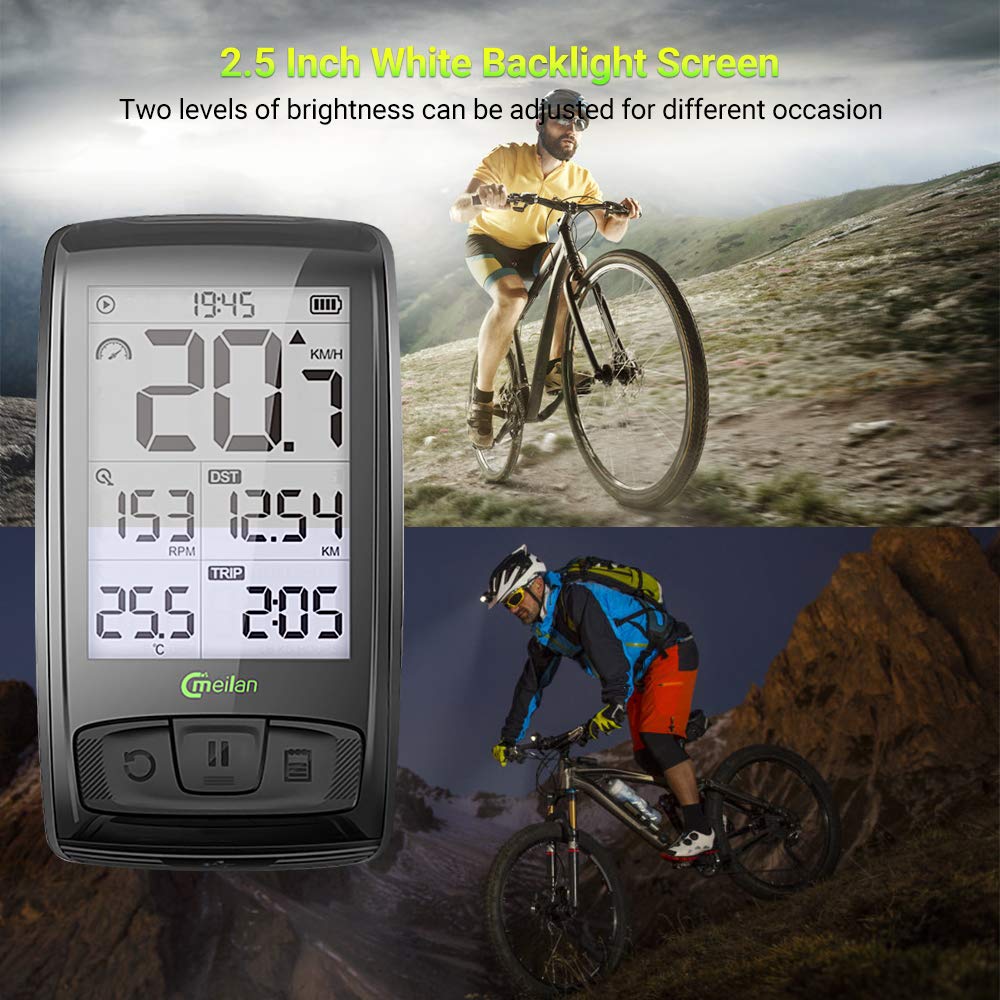
My wife has recently taken up cycling, and I recently purchased a cycling computer for her bike.Now it is time to put one on mine and after doing some research, the wireless Meilan cycling computer was the one that I chose to go with for myself.What I liked about it, was that it had both the cadence and speed sensors, which connect via Bluetooth 4.0 BLE to the 2.5” backlit LCD display.The unit was very easy to set up, and the directions are easy to follow. The display can be set to km/miles, Celsius/Fahrenheit, and kg/lbs through the settings menu.The unit’s also capable of interfacing with a heart rate monitor, but I did not purchase it as I did not need it. Calorie counting is also an available function but I believe the heart rate sensor is needed in order for the computer to make the necessary calorie calculations.I’ve tried to lay out the pictures of the installation in the order I used to install the computer, from unboxing, to pairing. Once installed, the sensor has to be paired to the display unit the first time you set it up.Pairing mode is achieved by entering the settings mode (depressing the small button on the back of the display unit), entering the date, time, weight into the unit, then scrolling through until the symbols for the cadence and odometer flash, and Pairing is displayed. Once this is achieved, the pedal and tire sensors have to activated by pedaling the bike for to be about 20’ to 30’. As I did not have a heart rate sensor, the unit was left in pairing mode as it searched for additional sensors. There’s a way to stop that, but I just turned the unit off, and back on again after pairing the combined cadence and speed sensors.Please note, that to achieve proper accuracy, the tire dimensions must be calibrated with the display unit. This ensures that the right distance is used for each cycle of the speed sensor. You can mark and measure the distance of one revolution of your tire on the ground and do the math, or you can take a look at your tire and check the table in the instruction manual that provides this data, Mine was a 26 x 1.95 tire, but once you determine what size tire you have, you can fine tune your computer odometer settings accordingly.The wireless display unit is Micro USB rechargeable, and is also IPX55 for water resistance. The cadence/speed sensor uses a button cell battery that lasts between 3 and 4 months between changes.All in al, I’m very impressed with the build, quality, and functionality of the Meilan wireless cycling computer, and I look forward to the next bike ride with it.
D**Y
Must align magnets with sensor and arrow and adjust screw in base of lever of sensor!
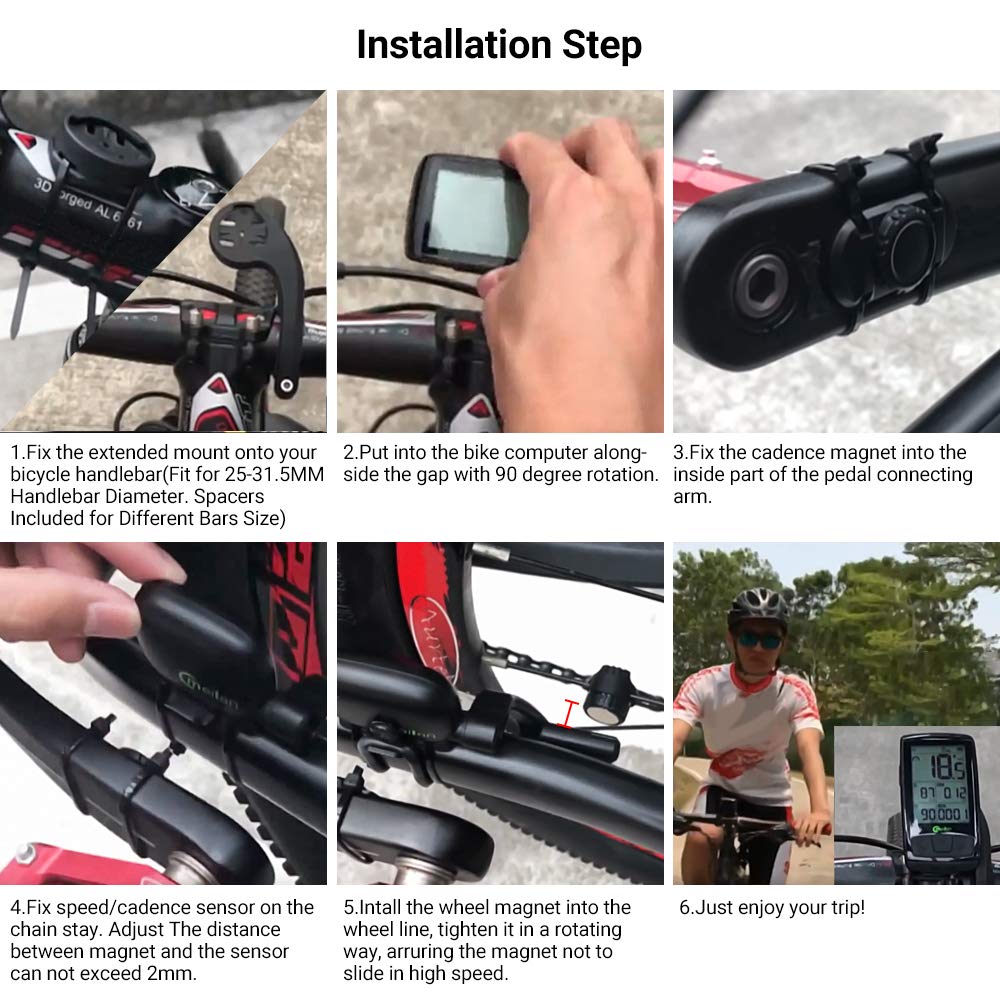
Installation of Wireless Bike computer was very easy with only 4 major components to secure to the bike frame. (1 pedal magnet, 1 spoke magnet, 1 speed/cadence sensor on rear frame, 1 handlebar mount for computer display).Please reference the ideal location in pictures with notes to get the best accurate readings from the sensors the Speed/Cadence.I found it to be very easy for aligning the parts after securing with zip ties to confirm spoke clearance and confirm magnet distance. must be minimal from the sensor arrow and lever location.Speed/Cadence sensor needs to be adjusted by a screw to raise or lower it. otherwise, speed will not register on the computer or even skip due to distance issues.Computer display mounting I would recommend using foam tape with double-sided adhesive from hardware store thicker the better as it will be squeezed by clamp as you secure the screw.Add Loctite Thread locker if possible to screw on mounting clamp for handlebar clamp. The vibration did loosen clamp noticeably.
D**R
Very Accurate and Fun to use
Your browser does not support HTML5 video. A few things for started regarding installation:Place the bike upside down.Be patient so you can be effective.It was a bit of a learning curve to install considering the easiest way to do so is by flipping the bike upside down. It takes a bit to orient yourself to install properly. Once it is all said and done, you don't have to think about it again. Although there are accessories that are not included in the box, the pictures show the other things to be added to this device which at first can be a bit confusing (like the pictures showing the heart rate monitor - not included).When install is complete the device keeps accurate logs of your trip. You can spend an hour setting up various trips comparing rides to and fro. If you are serious about knowing more about your health, this is a great addition to your diet and other means of monitoring your well-being.Definitely a must have for any bicyclist.
P**L
Easy to install
Just received the Meilan M4 bike computer, and am very impressed! I love the fact that it is bluetooth - my last one had wires trailing around the frame for the pickups.It was quick and easy to put the magnet on the wheel spoke, then add the pickup to the frame. My handlebars were too narrow to use the first mount, but the second one without the arm worked perfectly.It clips on and off the mount with a simple twist, as I wouldn't want to leave it on the bike when parked. I really bought it just for the speed, but having heart rate (with a suitable chest monitor) and cadence is a great benefit.The manual is clear, but I did understand it more after watching a youtube video to get it set up correctly.
A**R
Love the display
The computer was easy to install. I encountered a small problem with the installation. The small magnet assembly that is installed on the pedal assembly is meant to attach via double sided tape and two zip ties. My bike is a Cannondale and the pedal assembly has a concave back instead of the usual flat surface which meant the double sided tape had nothing to stick on to. I solved it by using a small bead of Silastic on the back magnetic assembly instead of the double sided tape.The bike computer took me about 45 minutes to install and setup but now that I know how to do it, I could install another one and set it up in 15 minutes.The bike computer works well and is easy to see and use. I would buy this again.
Trustpilot
1 month ago
2 months ago
